Tuesday, September 22, 2020

22SEP2020 - Paper BMP Part II

 So for this part of the build, I will go over my work on building up the main hull of the MICV, the "metal bawx!" to quote a certain Dawn of War: Soulstorm Chaos Space Marine leader...  

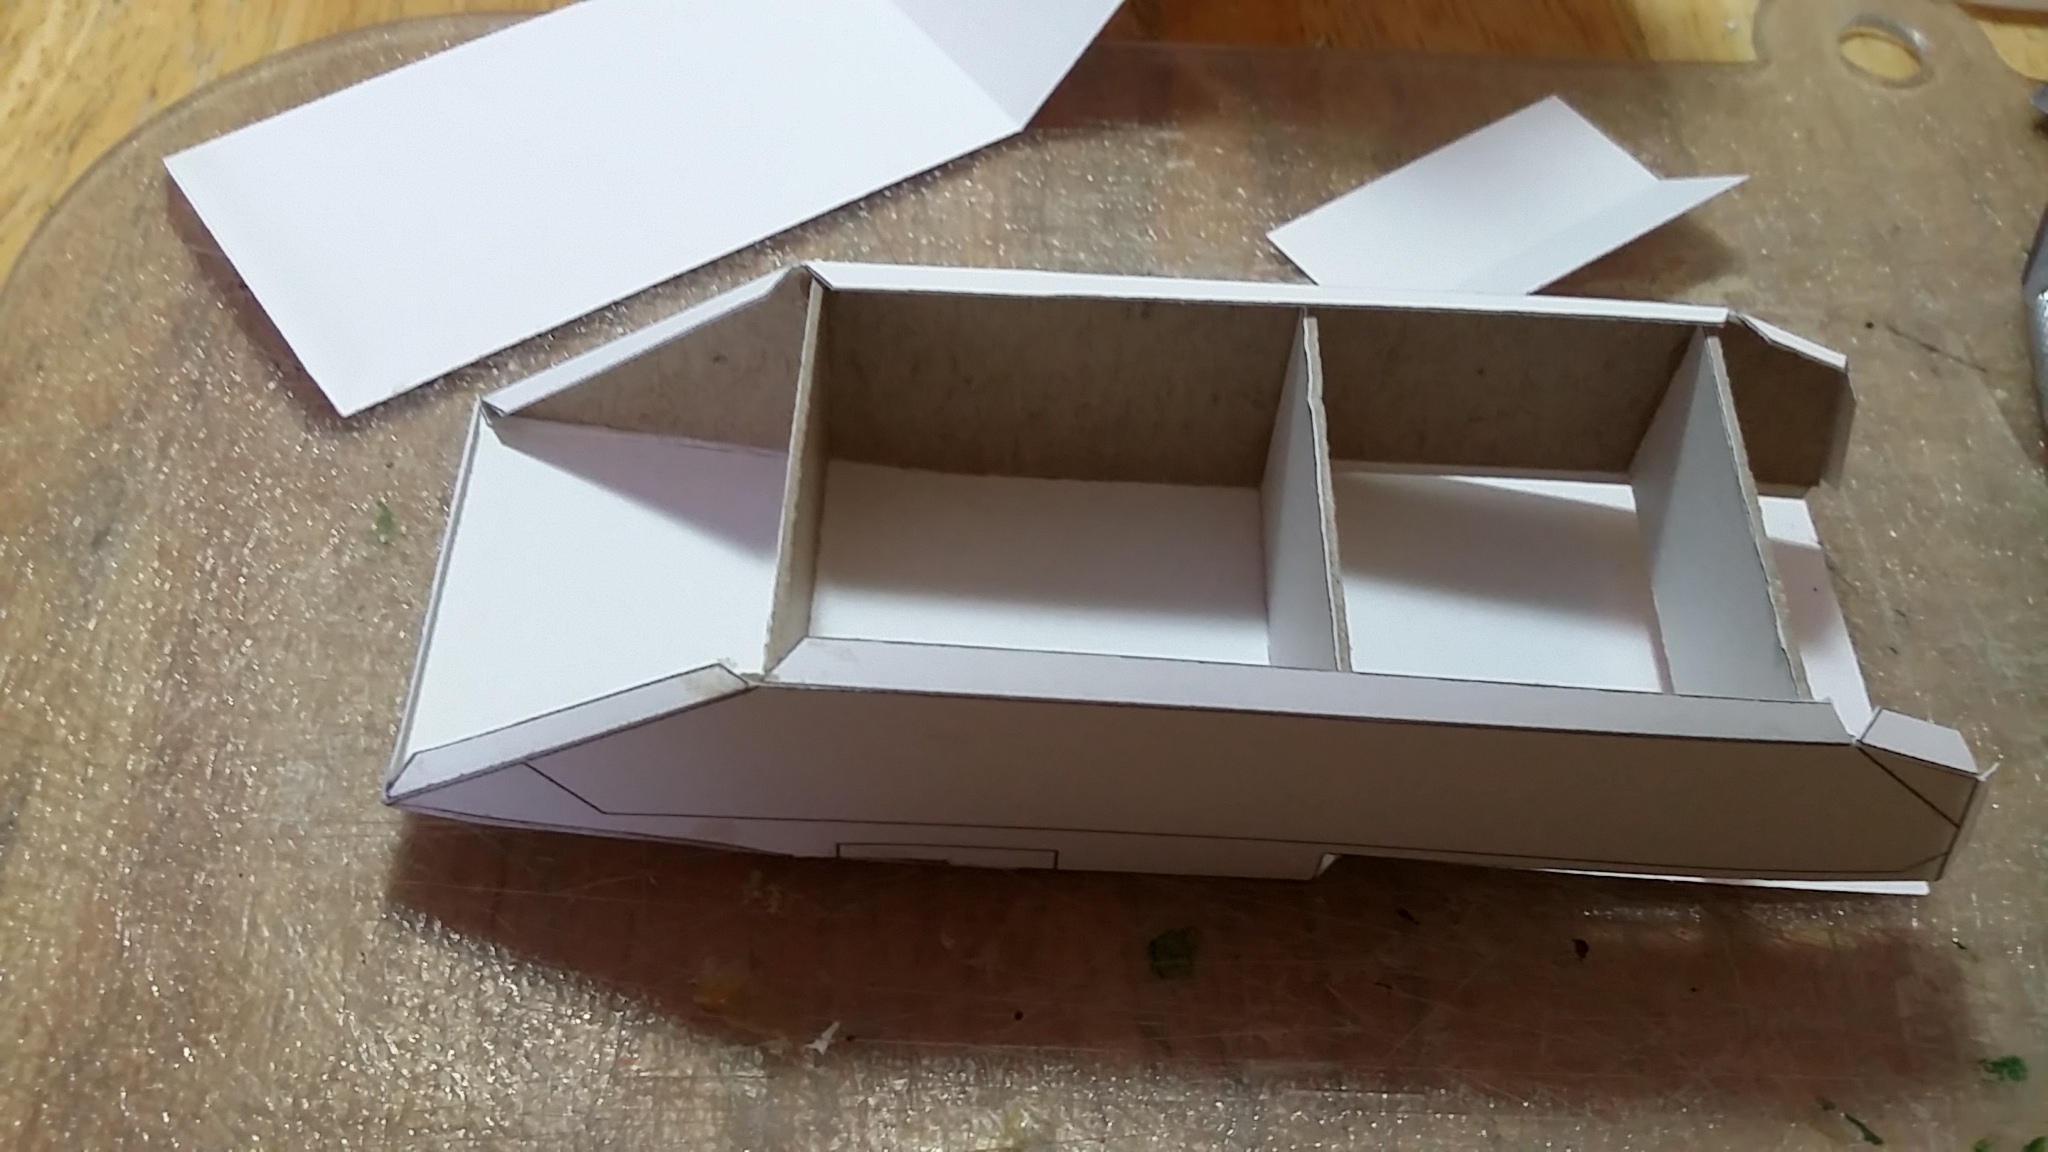
First off, this design is great as Patoroch designed some interior supports right off as your first parts.  These I originally printed on regular typing/copy paper and ended up using the glue stick to attach to some incredible cereal box type card or chip board.  It came from a food box, so, I have no 'craft store' or 'art store' term for it.  Treated right, this really stands out as a great foundation for the rest of the build to attach to.  In fact, other components showed some warping as a result of me not using this again in other places...


As you can see, that cereal box provided a very sturdy 'skeleton' on which to flesh out this armored vehicle.  Best part of armor building is that it truly is nothing more than figuring out the geometry of a box, and then adding greebles from there.  For this BMP, that was the rear of the hull where there is another box in the form of the upper rear hull where the weapons ports exist for the infantry dismounts to stick their barrels out of and engage the enemies on the sides of the vehicle (and as you can see, there are also two ports to the rear for such a reason).  


Now that the main hull box and the rear hull are attached, I add the side armor that provides the basis for the tracks to be applied.  This is our first step in laminating.  My analysis of the pattern and assembly led me to conclude this part needed to be a bit thicker than even my card stock.  So I glued the card stock part to the same cereal box card as my skeleton to form a thicker armor sheet on the sides of the hull to mount the tracks and other features.


Here we conclude this portion of the build workflow.  Keep the idea of lamination in the back of your mind though!  We will return to this later, a lot, I promise!

Monday, September 21, 2020

21SEP2020 - "Paper tiger" - BMP inspired "count's as" Chimera by Eli Patoroch

 Over the last couple of years I have been very deeply involved in building a lot of armor for the gothic SF universe Warhammer 40,000 (WH40K).  40K gamers are familiar with the cost of doing so, and would be surprised to find that for less than $100 USD I have been building just about non-stop without buying a single kit.  No, I download a design and print it out on nice card stock and start building it.  I spend months building a single one at times and proudly post my work on Zealot, Cardboard Warriors, and Facebook in the relevant Groups.  Part of why you rarely see hobby post here...  Sorry...  I'll try to do better!

Please take a moment to peruse the desktop printer compatible designs on the linked pages!  They are incredible, and will forever alter your perception of that humble piece of paper when combined with the right card thickness and reinforced with your morning cereal box.

Step one to any such project, find a printable template to build!  My first, project was created by a talented Ukrainian artist Eli Patoroch.  He wasted no time in combining features of Games Workshop's Chimera and it's source inspiration, the Russian BMP-1/2/3 series of Mechanized Infantry Combat Vehicles (MICV).  His template can found on the following Google Drive link, or you can search Zealot or the Facebook group I listed above.  For American/North American readers who have to use US Letter size paper, you can scale this down to about 96% to get the template to fit on our shorter but wider sheets.  I recommend 100#/271gsm for card stock weight.  Since building this, and scaling it, I've found an a US source for ISO A4 card stock that is close to that weight.  


Prior to finding the A4 size paper, this was the cardstock I used and scaled my templates down to.  After printing them, use a clear matte or clear flat spray coating on the printed templates.  Be liberal with how much you use, let one side dry, flip, and apply to the other.  I have found this does a wonderful job of eliminating much of the warping that occurs when you use glue.  It does not eliminate all of that, but I will get into that in much greater detail later.  I discovered this trick when I acquired some Dave Graffam models and read his Paper Model Guide which you can acquire freely on Wargame Vault.  This little tip opened the possibilities of papercraft as much as discovering how cosplayers build armor out of paper and coat it in epoxy resin before adding fiberglass and autobody filler.  This was the missing tool in my paper building skillset I so critically needed to discover!


Different project, blurry, but you get the picture.  Krylon Satin Finish or similar, and don't forget ventilation and a good face mask!  Mine has seen a lot of use given the scarcity of face masks lately, it only reinforces the need for good ventilation for this step.  Otherwise, your tools are much more simple.


Most of your basics: quality glue stick, quality PVA glue, good ol' No. 11 hobby blade, a ball end tool (smallest diameter you can find), and a strait edge (or three).  Different template than the BMP, same process building!


Why the ball end tool you may ask?  Two reasons.  First: every fold gets pre-creased with the ball end tool.  No matter which way I fold (mountain or valley fold), it will fold nicely with the tiniest of radius smaller than the thickness of the other material around it.  Second: details such as seams or gaps between armor panels, lightly depressed areas around view ports, and other such details get some treatment from the ball end tool.  This takes some time to analyze your build process to nail down just what exactly you need to do.  Patoroch models mostly come with an assembly drawing, normally without all the views you (think) you need.  Keep reference pictures handy in your search engine on a device near your workbench!  


That is all for now folks!


Thursday, May 14, 2020

May 14, 2020: Ooops!

So, in order to clear up some Google Drive space, I ended up deleteing quite a few photos.

Sadly, without realizing it, that includes everything I ever posted here using the Blogger tools for inserting images...

If anyone needs to see something I did again prior to this point, let me know.

I didn't just delete everything.  I spent time downloading EVERYTHING I delete and putting the zipped archive on my hard drive to preserve it.  I will have to look at getting my hobby stuff back up so I can put them back on this blog!


Sunday, November 24, 2019

24NOV19 Continuing and Finishing the Fire Giant

So, continuing reight along here I have my lower body painting process documented with pictures.  My chain mail rendering leaves much to be desired at this point, and so far...  My dry brushing got away from me and got into the depressions and didn't stay on the surface as desired...  So, going to bac to learn that method in the future, at least with chain mail!


I was quite happy with my mix of orange and yellow for the bronze and the use of three layers of turqoise for the gems.  Sure, being a Fire Giant maybe I should have gone for reds and other warmer colors...  But I like the contrast better this way.  Blame too many hours of Skyrim?


Here is the euipment belt with the knife in detail.  Three shades of just about everything but the leather.  I lighted all the paint with Ivory instead of white, and so far have never been upset at the results.  Always tends to leave me the option to highlight (either the color I mixed with Ivory mixed with white instead, or in the case of the knife handle that was painted Ivory, just white on the Ivory) with white paint later for the really shiny materials later!

Pre-final assembly, Giant and his loot for the discerning delving party to (try) to aquire from him.
Assembled and looking pretty sharp there!  Pardon my poor photography here.  That is in the works...  Base is pretty basic, just a simple 50mm round I found on Thingiverse and 3D printed for now.  I'll try to find, or make, a suitable dungeon style base in the future!


Detail of his face.  Hair was a base of Raw Sienna with orange (fire) highlights to drive home the Fire Giant heritage along with the red eyes and soot black skin.

Fire Giant stands heand and shoulders over the others!  Looks better than the earliest miniature I painted (up front, a GW LotR, second row back would be Reaper, with a WizKids Deep Cuts Fire Elemental [posted earlier] on the left and a Reaper Bones Minotaur on the Right).

Monday, November 11, 2019

11NOV2019 Fire Giant

I took work off today and spent some time doing Veteran stuff (like going to the local Strategic Air Command Museum in Ashland NE) and listening to a fellow Iraq veteran share their experience (in this case, Nick Rucker creates country music informed by such experiences).

Earlier in the day however, as my kids got me up early, I got a chance to work on my Reaper Bones Fire Giant:
I purchased him at The Game Shoppe in Omaha a couple of weeks ago during my local game group's Necromunda campaign.  His purpose is to stand in for Narthak the antagonist of the very first delve in my copy of Descent 1st Edition by Fantasy Flight Games (which sadly is out of print, but has been superseded by a very solid 2nd Edition.  Why might I replace the FFG miniature with this one?  Well, my kids are playing, and a painted unique Giant certainly looks better than the red unpainted boss monster (yeah, I haven't painted my Descent miniatures, yet...). 


He was just sitting on my desk with some 3D printed bases and other sundry unfinished (or I should say, under-finished...) models.  I decided to paint him first.  As a base coat, since this is Bones, I just went strait to the acrylics (Delta Ceramcoat) with plain black.  For the areas I intended to have lighter colors, I painted Ivory (an offwhite light earthtone/bone color).  He stayed like that the first game.  Fast forward a few days, to today.  I finished developing my color palette for my non-metalic gold and steel.  I have been particularly inspired by the Glass armor (upper tier light armor) from Elder Scrolls: Skyrim (the computer game, one of the best CRPGs in the last decade that is still played avidly by the fan base to this very day almost 10 years later from release).  Yes, glass armor, look up tank armor where they laminated two sheets of steel over glass and got better armor than similar thickness steel...  It works (well, prior to doing the same with depleted uranium and other exotic hyper-dense materials).  


I set up my handy wet palette (a food container with airtight lid, paper towel dabbed in water, and parchment paper on top) with the above colors.  Typically, I start dark, and blend a highlight, and then move into the lighter color.

Today I spent about an hour painting the arms with the sword and almost got it done today.

I am not certain I like the look of the sword blade yet, however the palette looks outstanding on the arm bands and the sword hilt.  Well, until next time.

Wednesday, November 6, 2019

Orks, bugs, and my painting evolution

Years ago I never blended colors together, or if I did, it was rather limited.  I painted with whatever was in the pot, and attempted to use another similar color in the pot if I did attempt to mix paint.  I never forced perspective, and did not give two hoots about what I read in Shep Paine's great tome of wisdom about building dioramas.  Arrogance of youth you might say.

Fast forward to when I took a 2D Design course as my Humanities Elective at my local community college (after all, if I need the credit, might as well have some fun...).  We took the primary colors in acrylic, and mixed them to get our color range.  We did limited palletes where we merely painted in a single color or de-saturated palletes, and all the wonderful other color concepts (to include black and white).  It only took a few years before I started exploiting this knowledge for my game miniatures.  You've seen the results before (in previous posts).  

Well, here are some pictures needing shared here on Sudsy's Tactics of the results of these experiments.  My memory is a bit foggy as to the exact pallete, but it involves the Delta Ceramcoat paint I've raved about before.  Well, my photography got better as well...  For the most part.


This is my Ork Nob for either Warhammer 40,000 or Gorkamorka.  This was a more recent use of both a wet pallete and more advanced forms of blending and forced perspective (thanks Shep Paine, I finally figured out what you meant, even if I don't have the full stop sign yet...).  However, this was not the first project...


My hive tyrant was my first us of what I learned in that 2D design course.  In fact, I used the same paint from that course thinned down considerably (after all, it was Liquitex Basics tubes...).  I loved the result, and I know it is NOT a completed model (yet).  I hesitate to complete it lest I ruin it...


This Carnifex is how I started out.  I cringe to think about how I left 1:1 scale lighting to do the work on a 28mm figure.  Sure, it works alright for a large bug like this...  But only 'alright' to 'sorta'.  Guess I can say that 2D design course was worth more than the Humanities Credit I took it for in the first place!

Wednesday, November 28, 2018

T-55AMVs in 15mm Complete!


It only took a couple years from purchasing the base kit, through starting to cut my first pieces of styrene for the skirt armor and adding the first reactive armor bricks in green stuff, to painting!

But I am pleased with the results.  Not high grade sculpting, not scale model quality, but great table top gaming quality (i.e. you can touch them, and drop them, without worrying too much about damaging them much).

Details are from the third tank I did.  When I got around to this one, I had the process of sculpting the armor down to a science (or near enough), and am most happy with the level of detail I achieved.  I almost exceeded my goal of conveying these were the upgraded T-55s through a minimum of detail...  Yeah, I really wish I felt I could have spent more time to do these better.  However, I did compensate for the lack of sharp sculpted detail with some paint highlights that force the perspective, and the results are more impressive than I was looking for!

Painting included the use of Krylon Camo tan for the primer, and then my usual assortment of Delta Ceramcoat acrylics (Dark Forest Green, Trail Tan, and then highlights), and Game Color (gun metal metalic).

This platoon is ready for action in the Fulda Gap with Team Yankee, or some third world brush war in the modern era with Force on Force!