Showing posts with label miniatures. Show all posts

Wednesday, November 28, 2018

T-55AMVs in 15mm Complete!


It only took a couple years from purchasing the base kit, through starting to cut my first pieces of styrene for the skirt armor and adding the first reactive armor bricks in green stuff, to painting!

But I am pleased with the results.  Not high grade sculpting, not scale model quality, but great table top gaming quality (i.e. you can touch them, and drop them, without worrying too much about damaging them much).

Details are from the third tank I did.  When I got around to this one, I had the process of sculpting the armor down to a science (or near enough), and am most happy with the level of detail I achieved.  I almost exceeded my goal of conveying these were the upgraded T-55s through a minimum of detail...  Yeah, I really wish I felt I could have spent more time to do these better.  However, I did compensate for the lack of sharp sculpted detail with some paint highlights that force the perspective, and the results are more impressive than I was looking for!

Painting included the use of Krylon Camo tan for the primer, and then my usual assortment of Delta Ceramcoat acrylics (Dark Forest Green, Trail Tan, and then highlights), and Game Color (gun metal metalic).

This platoon is ready for action in the Fulda Gap with Team Yankee, or some third world brush war in the modern era with Force on Force!

Sunday, November 25, 2018

25NOV18 - Tossing Stones, the painting process

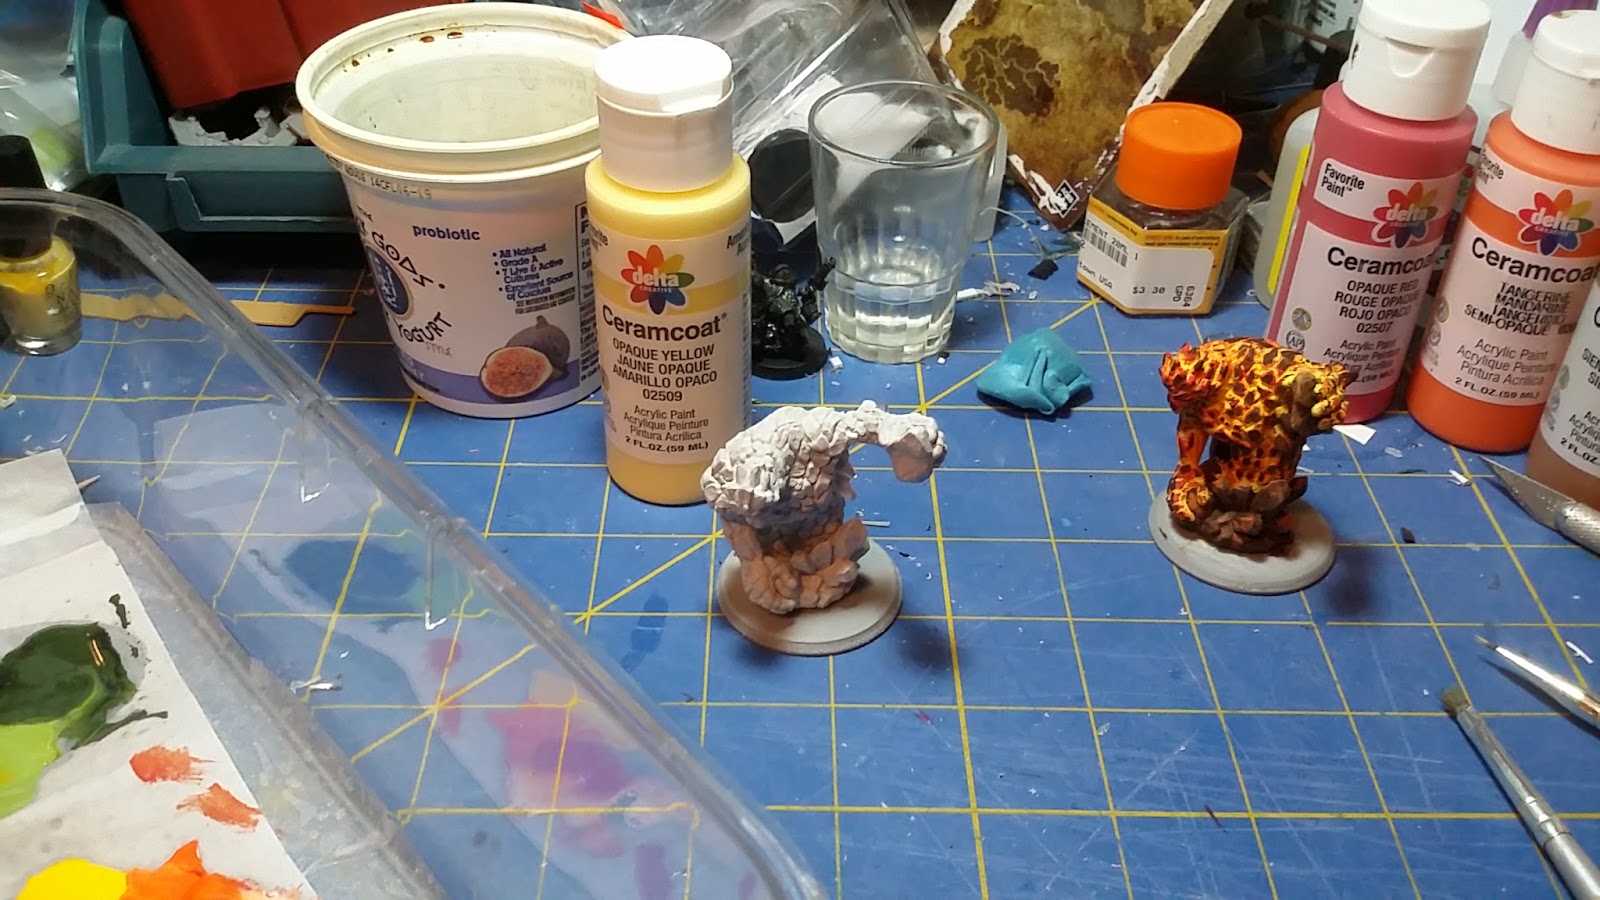
So, for starters, this is the Wizkids Pathfinder Deep Cuts Medium Earth Elemental (SKU 73357/UPC 63448273357-8 for those interested in acquiring exactly this pair of miniatures). The package comes with two of them, and costed about $5 USD. That would be about $2.50 a miniature, and both are very detailed, and frankly rival anything Games Workshop puts out without being charged through the nose. They are pre-primed as well. This is a two edged sword however, as you are going to spend some time removing mold lines, which on these guys is not too bad as they are pretty easy geometrically to scrape mold lines off of. On these guys, I did not find myself re-priming. The light primer surface really enhanced the way I was going to paint them. Wizkids chose to do a, to me, boring grey rock type elemental with green crystals on the clear elements attached to the torso. I wanted something different…

I wanted more of a molten, lava, living elemental coming strait through the crust from the core of the planet! Sure, it runs the risk of overlapping a fire elemental… But hey, the core of our planet is molten iron, why would an earth elemental not be of the same material? Makes sense to me. My palette for this project was simple. Delta Ceramcoat (higher quality US acrylic craft paint, does everything my Liquitex acrylics have done, without all the thinning…) Opaque Yelllow, Opaque Red, Tangerine, Raw Sienna, and Burnt Umber. So far, that Opaque Yellow is a great “go-to” for painting anything that is going to be yellow! Make sure to prime the surface in a light color (as these were already pre-primed, that was easy). Whenever I use a black or dark grey primer, I tend to use Ceramcoat Ivory on the desired surface, and that tends to do the trick.


I also got to play with my improvised wet palette, basically a food container, wet paper towel, and a piece of parchment paper!
Step 1: Using a flat brush (in this case, a #3 Bright), coat the elemental in Opaque Yellow, and ensure you get the paint into the cracks and crevices. This is the base coat for the elemental. Base coat the earth with Burnt Umber.

Step 2: Using the flat brush again, drybrush orange onto the surface of the elemental, don’t panic if you get some of the orange paint into the cracks and crevices of the elemental, we will use this chaos in our miniature to turn it into art, and we’ll also go back and get some of that later.

 
Step 3: Do Step 2, but with the Opaque Red

 
Step 4: Now we take our 15/0 or 20/0 round brushes, and use some more Opaque Yellow sparingly in the crevices to re-coat them with the much lighter paint. This will serve to add the glowing from the inside effect we will want when we get done.


Step 5: Now, the moment of truth for the lava effect! Grab the Burnt Umber, and using a combination of the flat and round brushes, pick up the high points on the elemental’s surface. After all, lava and molten iron cool away from the source of the heat, and it has the darker color effect. This is also when we take the Raw Sienna and highlight the areas on the rocks (using dry brushing), and maybe mix in a bit of the yellow and orange to add some glow to those edges remembering that the primary light source for those would be the figure of the elemental itself. I chose not to paint the crystals translucent, and just make them a part of the elemental. When I figure out those translucent spell effects, I’ll share…


 So, there you have it folks!  Economical limited palette anyone can try at home!  All said, I think the cost of the brushes years ago outstripped the cost of these two miniatures and paints combined...  Even then, not my much (the nice Reaper and Liquitex brushes anyway).  So, when I get to use these in a game, perhaps Dragon Rampant, someday you might see a battle report!

Friday, November 23, 2018

23NOV2018 Tossing stones!

Tossing stones with a Wizkids Deepcuts Medium Earth Elemental!


Wednesday, July 8, 2015

07JUL2015 "BIMP" spotted...


Soviet designed, and very first, Mechanized Infantry Fighting Vehicle (MICV) BMP-1 that is.  This one is a Khurasan Miniatures  15mm/1:100 scale version.  I ordered these back in May, and they were worth the wait.  Khurasan is a small miniature company based out of New York (the state, not  the city).  While small in corporate footprint, their work is nothing less than spectacular in the world of 15mm wargaming on this side of the pond (as the majority of the hobby is produced in merry ol' England).

Being a fan of Osprey's publication of Ambush Alley Games "Force on Force" and "Tomorrows War" I jumped at the chance to spend my tax return money (thankfully I got one this year...) on a good force.  Having spent some time in service in the USAF TACP training to hunt Soviet trained and equipped forces (no matter how long the Cold War ended, American and Soviet methods and equipment are still the two most proliferated in the world, even with local modifications and upgrades), I decided to dig up some TO&E from an old manual (FM-100-2-3) and make a Mechanized Rifle Regiment (MRR) rifle company.  Another good reference is the suggested force list in the back of "Force on Force".  I like the FM reference a bit more, with some added information from sources that have come forward since the end of the Cold War.  I've read about extra machine gunners attached to platoons, and in the Warsaw Pact Forward Area MRRs facing NATO, a couple of extra BMPs at the company level carrying laser/optic jamming gear.   Such variations are to be expected, as any good military organization can be that flexible.
Good cast parts on the BMP, with some 15mm QRF Strykers
in the background...

I ordered three BMP-1s from Khurasan along with their Motorized Rifle Platoon set of miniatures.  I look forward to getting the miniatures done next.  Today I'm going to discuss my building of the first BMP.  Upon opening the plastic bag and pouring out the parts, I must say I'm very impressed by the quality of the resin casting from this small company.  Very little cleanup was needed compared to other resin parts I've worked with from bigger manufacturers.  Just some slight mold lines here and there to tidy up, and the mold sprue lines were sized just right to make them easy to remove with just a No. 11 hobby blade and not have to grind with a rotary tool.  Mold lines were so well chosen on all the parts, including the pewter, that I hardly spent any time scraping or filing.  I did have to clean a bit of the sprue from the rear of the vehicle to make room for the doors.  If you look closely enough, you will see that Khurasan made the master with a very good 3D print.  This does not effect the detail in any way, as being familiar with armored vehicles, slight imperfections are only going to add to the realism when they are painted.

A close inspection of the deck shows the 3D printed pattern of the master, dwarfed by many fine details
including the drivers periscopes and screws holding the vents and other panels in place.

Only a little cleanup needed here.

Assembly was pretty easy.  I did have to reference some photos of BMPs to ensure I got the right door in the right spot.  I thought about making the doors open and getting some crew figures, but the rigors of handling during a game would make that a bit labor intensive on the constant repair side.  Last thing I want to do in a game is fix a miniature or lose a part.  I am only worried about the the AT-3 on the turret over the barrel.  In 15mm, these are TINY and don't have a lot of surface area for glue to form a bead and hold it in place.  Caution will need to be exercised when handling this piece!  Keep the super glue solvent handy along with tweezers, this is a part you will likely glue to Mr. Hand during assembly.  For once, luck was with me and I did not glue myself to the project leaving 1:1 scale finger prints.

Assembly went well with the tracks fitting the body of the BMP with a tighter tolerance than some more expensive plastic kits I've built in the past.  The only gaps were the along seams that exist on the real vehicle.  No filler putty was required.  Each of the road wheels could be glued into place along the bottom of the body, however I like the way the tracks were flexed slightly on the bottom.  This can add to the model when based on the appropriate terrain, as few armored vehicles I've ever seen have perfectly level tracks in contact with the earth.

Pewter parts attached to resin with good points of contact along hatch edges and hinge points.  Troop commanders door was a bit rough though, being a half moon shape, it fell into the hatch a few times.  Good candidate for gluing open for those who choose to do so.

I look forward to priming and painting this kit.  Khurasan Miniatures are well worth every penny and any wait to receive.

BMP-1 from Khurasan completed

BMP-1 from Khurasan, rear troop doors.


Wednesday, December 11, 2013

11DEC13 Where is Sudsy?!

Well, I just wanted to let my followers know I haven't fallen off the face of the earth (yet, though I keep trying to convince my wife we need to take the kids and exit the earth gravity well and live on the Moon or Mars...).

Obviously, not much time for games and the like.  I took to continuing my education and am currently in the Winter Quarter of my first year in obtaining my Associates Degree in Applied Science.  I'm going into Precision Machine and am going nail down a job as a machinist.  Considering the way 3D printing is going...  That is going to be where I'm going to try to grow.  I already see 3D printing in the gaming world alongside sculpting and resin casting!

Speaking of sculpting, I've become addicted to Howard Tayler's Schlock Mercenary web comic.  Here is a fan sculpture and learning sculpture of a 28mm version of on of his characters, a Unioc named Lt. "Ebby".  If you read the strip, you'll know who...  If not, well I'm not telling you much beyond that to get you as hooked as myself!

 Nearly finished green
 Phase 2
Phase 1

Thursday, March 21, 2013

21MAR13 And now for something a little different...


I am a sculptor. I know this shouldn't shock any of you as one of my very first blog posts years ago was about my first 1:6th scale figure... I've just started on another direction here recently, a massive drop in scale down to somewhere between 25mm to 32mm scale figures (as measured from toe to the top of the head, or toe to eyeball; depending on the sculptor and/or figure manufacturer). My photos are from making some dollies (what you call a very small scale figure armature) I made using a tutorial by Jason Miller on Matakishi's Tea House (http://www.matakishi.com/). I've been following Jason's sculpting work on Deviant Art for some time now taking mental notes and planning my start up. Obviously I had to have a stable place to set up and that wasn't happening for some time from 2011 onward as my family began our move from Alaska down to Nebraska starting in 2011... Yup, it took THAT long, almost three years to finally have real art space again (and even now its a bit, well, temporary as we are just renting a house...).

My workbench is a piece of 3/4” MDF board that measures about 3' by 5' across set up on some extra tall saw horses I made using brackets and 2x4's I cut myself, its a standing work bench, but when I sit in my pneumatic stool, it puts the surface at just below eye level allowing me to rest my elbows on it and work. Will this help? We shall see...
Everything I used today...
Dollies pre-solder.
How to avoid burns with the soldering iron...
About the right proportion, soldered...

A torso added with Green Stuff
The bench with the works in progress, and inspirational figures...

I pulled out about six corks I had in my sculpting tools along with some 24 ga. Copper wire and good ol' rosin core 60/40 electronic solder. I followed along with Miller's Lesson 1 and proceeded to build some dollies for figures pretty much following the designs he had to a letter with one exception. Instead of using a bit of green stuff to hold my twist together I soldered at that joint. Why? Well why waste green stuff on that? I'd rather solder it at this point, and in fact if it were a larger figure I'd use a cheaper epoxy for that part underneath anyway as Citadel green stuff is over $10 USD for .7oz/20g worth... Its running neck and neck with the street value of some illegal drugs being run by violent cartels (and with the way GW is with creatively interpreting IP and going ofter anyone who sells their product and posts pictures of it on their online store, or sells left over parts, or creates fan art one wonders if GW isn't their own cartel...).

Some notes on that epoxy price...  
Citadel Green Stuff in Omaha NE is about $10 USD for .7oz/20g
J-B Weld SteelStik in Omaha NE is about $9 USD for 2oz/57g (granted its not going to get the fine details, but I have used it for holding my armatures for larger figures in 1:6th and 1:12th scales...) with Locktite and other comparable brands being close in price for the same size.
A search on Amazon yielded some fruitful results for other model grade sculpting epoxy compounds:
Gale Force 9's version of Green Stuff is about $22 USD for 4.5oz/130g

Not too shabby GF9!  However, the winner overall for product quality and value has to be Magic Sculp with a close second being Apoxie Sculpt...  Both of which I have used extensively in the past before moving forced me to give away the remainder of these fine products.  
Apoxie Sculpt can be found in 1 lbs and 4 lbs weights for $12 and $33 USD respectively (sorry no metric conversions here on these, its late!)
Magic Sculp can be found in 1 lbs and 5 lbs(!!!!!) for $16.50 (okay, Apoxie wins in the 1 lbs weight class) and $33.50 USD (here we have the 5 lbs class title at only about $2 more for a whole pound extra).

Difference between green stuff and the Apoxie/Magic stuff is going to be the manner in which you work.  Green stuff is going to give you a more immediate satisfaction for working time, and therefore its pretty nice in that regard as its hard and sculpt ready moment you mix it.  My experience with Apoxie taught me the value of patience, I couldn't sculpt with it for almost an hour as it needed that time to set up a bit.  This is a severe disadvantage in my current stay-at-home dad mode with kids teaching me that Chaos is the natural state of the universe...  Magic Sculp was workable in about 10 to 15 after mixing if I recall, and I greatly appreciated that its labeled as 'resin' and 'hardener' instead of just 'A' and 'B'.  Both are superior products, equal to green stuff/Kneadatite in their own way, and value wise blowing green stuff out of the water completely.


Saturday, February 18, 2012

18FEB12 OGL Rant


So, while the D20 OGL SRD (http://www.wizards.com/default.asp?x=d20/article/srdarchive) this led to:

"When it was published in 2000 along with the 3rd edition of the rules, the OGL sparked unprecedented growth in the RPG industry. The OGL made it so easy to use the rules conventions of D&D like hit points, spells and monsters that hundreds of products - the official signifier of D&D-compatible materials created using the OGL - emblazoned on them made their way to game store shelves."
-Escapist (http://www.escapistmagazine.com/articles/view/features/9292-The-Ghosts-of-D-D-Past.2)

Why did WotC not do the same with D20 4.0?  After all, they are suffering right now, and I am believing its a result of ending the continued use of an OGL SRD with the newest editions!

The OSR is on the rise, along with other digital media creating a paradigm shift in the world of traditional gaming:

"Changes in how people buy RPGs and the freedom of the OGL combined to make the Old School Renaissance grow across the internet. The rise of digital distribution of PDFs through marketplaces like DriveThruRPG.com have allowed designers to make money selling their work with less overhead. The costs of printing books has also decreased, especially print-on-demand services that allow smaller print runs, so it's easier than ever for amateur designers to publish something gamers can bring to the table and use with any of D&D's older editions or retro-clones."
-Escapist (http://www.escapistmagazine.com/articles/view/features/9293-The-State-of-D-D-Present.3)

Right now the world of games is going through a paradigm shift.  Board games are still going strong in many respects, but also deal with similar limitations.  What we all enjoy though is an increase in development budget, but we pay for it.  Fantasy Flight Games makes beautiful board games with high quality laminated cardboard components and beautifully sculpted plastic pieces that used to only be the realm of pewter.  However, its around $70 to $150 for these games as opposed to the $20 to $50 the same game concept years ago used to cost (part of that is indeed inflation).  RPGs however, are contracting sharply.

Steve Jackson Games publishes most GURPS supplements electronically, and spends the majority of the printing budget on the biggest cash cow of the company, Munchkin (I enjoy Munchkin myself...).  Other game companies are starting to publish more and more through DriveThru RPG and RPG Now.  Holdouts like WotC are suffering (that 4th Ed. wasn't so well received...).

As a result, we've seen the OSR take the OGL and thrive online.  Be it free rules, or low cost .pdf and print on demand, indie development seems to be rising.  Sales wise its harder to track...  Number of downloads would be an interesting figure to find out between the biggest names I've seen from OSRIC, Swords and Wizardry, and Basic Fantasy; along with sales of Labyrinth Lords and others.

Frankly, I think we need to embrace the OSR.  Where D&D 3.0, 3.5, 3.75, and 4.0 to varying degrees seemed to have failed is competing with computers.  Where the OSR takes 3.5 and strips the SRD down to the basics, and gives the GM a lot of story telling and rules adjudication power, it seems to thrive.  Volumes of rules, be it the many GURPS books I've enjoyed over the years, or some of the 3.5 books a friend gave me, only serve to slow down games.  Most of the gruntwork is best done by a computer, and then you wonder why you want to sit at the dinner table with a group of friends (unless you have a good GM who will throw the rules out some of the time anyway, which frankly is how the rules recommend being played anyway...).

That, and I'm a sucker for anything of quality to come out of Open Source.  I have little money to spend and waste on games anymore.  If the rules are free, I'll take em and use them when I feel like dungeon delving.  I'll use my "Descent: Journeys into the Darkness" game board and figures with BFRPG or Microlite 20...  Why the hell not?  To top it off, I like to draw pictures and get my art out there.

So, anyone in the OSR development world working a real job and designing games on the weekend is more than welcome to bug me about drawing up some creature sometime.  So long as the deadline is flexible...  I'll embrace OSR and OGL and use my FOSS image editing software (www.gimp.org and www.inkscape.org) and have some fun with you, for free.