Showing posts with label Delta Ceramacoat paint. Show all posts

Sunday, November 24, 2019

24NOV19 Continuing and Finishing the Fire Giant

So, continuing reight along here I have my lower body painting process documented with pictures.  My chain mail rendering leaves much to be desired at this point, and so far...  My dry brushing got away from me and got into the depressions and didn't stay on the surface as desired...  So, going to bac to learn that method in the future, at least with chain mail!


I was quite happy with my mix of orange and yellow for the bronze and the use of three layers of turqoise for the gems.  Sure, being a Fire Giant maybe I should have gone for reds and other warmer colors...  But I like the contrast better this way.  Blame too many hours of Skyrim?


Here is the euipment belt with the knife in detail.  Three shades of just about everything but the leather.  I lighted all the paint with Ivory instead of white, and so far have never been upset at the results.  Always tends to leave me the option to highlight (either the color I mixed with Ivory mixed with white instead, or in the case of the knife handle that was painted Ivory, just white on the Ivory) with white paint later for the really shiny materials later!

Pre-final assembly, Giant and his loot for the discerning delving party to (try) to aquire from him.
Assembled and looking pretty sharp there!  Pardon my poor photography here.  That is in the works...  Base is pretty basic, just a simple 50mm round I found on Thingiverse and 3D printed for now.  I'll try to find, or make, a suitable dungeon style base in the future!


Detail of his face.  Hair was a base of Raw Sienna with orange (fire) highlights to drive home the Fire Giant heritage along with the red eyes and soot black skin.

Fire Giant stands heand and shoulders over the others!  Looks better than the earliest miniature I painted (up front, a GW LotR, second row back would be Reaper, with a WizKids Deep Cuts Fire Elemental [posted earlier] on the left and a Reaper Bones Minotaur on the Right).

Wednesday, November 28, 2018

T-55AMVs in 15mm Complete!


It only took a couple years from purchasing the base kit, through starting to cut my first pieces of styrene for the skirt armor and adding the first reactive armor bricks in green stuff, to painting!

But I am pleased with the results.  Not high grade sculpting, not scale model quality, but great table top gaming quality (i.e. you can touch them, and drop them, without worrying too much about damaging them much).

Details are from the third tank I did.  When I got around to this one, I had the process of sculpting the armor down to a science (or near enough), and am most happy with the level of detail I achieved.  I almost exceeded my goal of conveying these were the upgraded T-55s through a minimum of detail...  Yeah, I really wish I felt I could have spent more time to do these better.  However, I did compensate for the lack of sharp sculpted detail with some paint highlights that force the perspective, and the results are more impressive than I was looking for!

Painting included the use of Krylon Camo tan for the primer, and then my usual assortment of Delta Ceramcoat acrylics (Dark Forest Green, Trail Tan, and then highlights), and Game Color (gun metal metalic).

This platoon is ready for action in the Fulda Gap with Team Yankee, or some third world brush war in the modern era with Force on Force!

Sunday, November 25, 2018

25NOV18 - Tossing Stones, the painting process

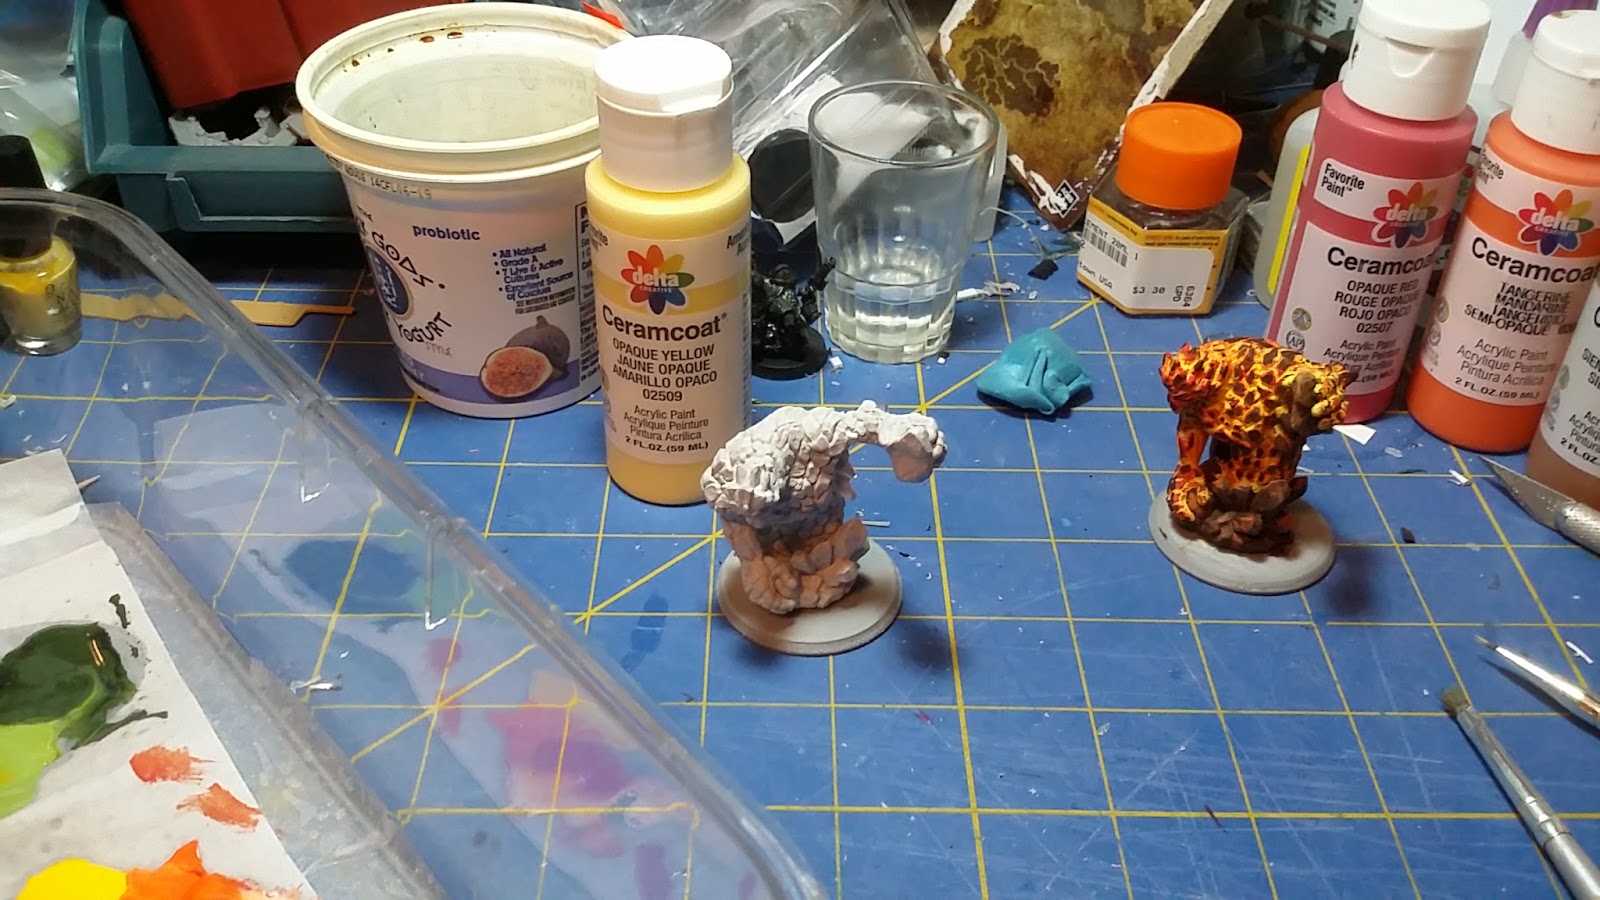
So, for starters, this is the Wizkids Pathfinder Deep Cuts Medium Earth Elemental (SKU 73357/UPC 63448273357-8 for those interested in acquiring exactly this pair of miniatures). The package comes with two of them, and costed about $5 USD. That would be about $2.50 a miniature, and both are very detailed, and frankly rival anything Games Workshop puts out without being charged through the nose. They are pre-primed as well. This is a two edged sword however, as you are going to spend some time removing mold lines, which on these guys is not too bad as they are pretty easy geometrically to scrape mold lines off of. On these guys, I did not find myself re-priming. The light primer surface really enhanced the way I was going to paint them. Wizkids chose to do a, to me, boring grey rock type elemental with green crystals on the clear elements attached to the torso. I wanted something different…

I wanted more of a molten, lava, living elemental coming strait through the crust from the core of the planet! Sure, it runs the risk of overlapping a fire elemental… But hey, the core of our planet is molten iron, why would an earth elemental not be of the same material? Makes sense to me. My palette for this project was simple. Delta Ceramcoat (higher quality US acrylic craft paint, does everything my Liquitex acrylics have done, without all the thinning…) Opaque Yelllow, Opaque Red, Tangerine, Raw Sienna, and Burnt Umber. So far, that Opaque Yellow is a great “go-to” for painting anything that is going to be yellow! Make sure to prime the surface in a light color (as these were already pre-primed, that was easy). Whenever I use a black or dark grey primer, I tend to use Ceramcoat Ivory on the desired surface, and that tends to do the trick.


I also got to play with my improvised wet palette, basically a food container, wet paper towel, and a piece of parchment paper!
Step 1: Using a flat brush (in this case, a #3 Bright), coat the elemental in Opaque Yellow, and ensure you get the paint into the cracks and crevices. This is the base coat for the elemental. Base coat the earth with Burnt Umber.

Step 2: Using the flat brush again, drybrush orange onto the surface of the elemental, don’t panic if you get some of the orange paint into the cracks and crevices of the elemental, we will use this chaos in our miniature to turn it into art, and we’ll also go back and get some of that later.

 
Step 3: Do Step 2, but with the Opaque Red

 
Step 4: Now we take our 15/0 or 20/0 round brushes, and use some more Opaque Yellow sparingly in the crevices to re-coat them with the much lighter paint. This will serve to add the glowing from the inside effect we will want when we get done.


Step 5: Now, the moment of truth for the lava effect! Grab the Burnt Umber, and using a combination of the flat and round brushes, pick up the high points on the elemental’s surface. After all, lava and molten iron cool away from the source of the heat, and it has the darker color effect. This is also when we take the Raw Sienna and highlight the areas on the rocks (using dry brushing), and maybe mix in a bit of the yellow and orange to add some glow to those edges remembering that the primary light source for those would be the figure of the elemental itself. I chose not to paint the crystals translucent, and just make them a part of the elemental. When I figure out those translucent spell effects, I’ll share…


 So, there you have it folks!  Economical limited palette anyone can try at home!  All said, I think the cost of the brushes years ago outstripped the cost of these two miniatures and paints combined...  Even then, not my much (the nice Reaper and Liquitex brushes anyway).  So, when I get to use these in a game, perhaps Dragon Rampant, someday you might see a battle report!

Wednesday, December 30, 2015

30DEC15 ACU in 15mm Followup Comments


Here were my first choices for replicating ACU using acrylic paint.  My cover, with SFC rank (a rank I obtained with the Alaska State Defense Force, I only ever made SSgt. in the USAF on Federal Active Service) was worn a lot and reflects a bit of the UV light exposure and field conditions with some cleaning done on it.  Obviously, it was nowhere near as bad as the cover I wore in Iraq that I sent to the USAF Museum along with my ACU's....  

Delta Ceramacoat Ivory, Dark Forest Green, and Hippo Grey mixed best to replicate the 1:1 scale reference source.  Ivory was the best base coat, mixed in with drops of grey or green as looked good at the time under a full spectrum Ott Light I use at my desk.


Here is the Khurasan US Army 15mm miniature that I have painted to be a USAF TACP (Tactical Air Control Party, AFSC 1C4X1 or the old 275X prior to 1994 or so) to fulfill Force on Force game role of TAC (terminal air controller).  Base coat was Ivory with some Dark Forest green (I'd venture to guess 15 parts Ivory, 1 part or less Dark Forest Green).  I used strait Trail Tan to paint the Interceptor Body Armor (IBA), boots, and backpack along with any web gear pouches.  Why?  Well, in 2005/2006 when I deployed with the 172nd Stryker Brigade, we had ACU uniforms and DCU or Coyote Tan everything else.  That means IBA covers, backpacks, web gear, and PPE (personal protective equipment like goggles and knee pads) hadn't caught up to the new ACU Universal pattern.  Boy, was there ever a mix of uniform camouflage schemes.  Wargamers simulating the "Surge" era and just prior shouldn't feel compelled to make US Army forces all wear the same gear types.  Depending upon when a Brigade Combat Team arrived in country, there were huge variations in uniforms.  Black, woodland, and DCU components can be spread liberally along with ACU Universal pattern for that period of 2005 through 2007.  Marines even had variations in uniform types, our ANGLICO counter parts wore desert pattern Marine uniforms with Coyote Tan IBA and web gear, but had the usual Marine camo backpacks as per 2nd MARDIV SOP at the time.  They go special permission, with their critical mission, to wear Coyote Tan assault packs to carry radios.  Uniformity has its limitations and disadvantages.


On my foreground mixing palette, you can see my base coat of the Ivory and Dark Forest Green.  I also tried, and I emphasis TRIED Foliage Green and found it mostly useless for the time being for ACU.  However, the gloves on the other hand might be painted with this color as it matches the Nomex or Kevlar gloves a lot of guys wore.  Gloves can vary even more so than other uniform components.  I've seen crazy mechanics gloves on Infantry grunts before.  Have fun!  

When I painted equipment, I added black to the Hippo Gray until I was happy with the color.  I figure I shouldn't use strait black on the miniatures themselves, and this will help with highlighting later.  I obviously opted for NVG's on all but my heavy weapons guys (who fires and AT-4 or Javelin with NVG's up anyway?  Well, I never did, so if you did, sorry, I ran out of NVG's and didn't put them on the Javelin guys or Sniper/Designated Marksmen).  I think they add a bit to the miniatures along with getting the point across that most, if not all, US units went out with NVG's when I was in Iraq (a result of lessons learned in Mogadishu, yes we ALL watch "Blackhawk Down").  Pardon the Transformer toy in the background.  Optimus Prime is watching over these fellas.

So far I'm pretty pleased.  I might use more green in my base for future ACU miniatures, or hit these guys with more of the green.  You really cannot see my efforts to put some of the light foliage green using a higher percentage of green in my Ivory base.  That is a problem.  Right now, they look like DCU's or Marine Desert more than ACU universal.