Showing posts with label wargames. Show all posts

Tuesday, January 5, 2021

05JAN21 - Paper Sentinel Build Video


In tune with my papercraft armor as of late, the above is my video slide show of my build process with photos I took to document my build on the Zealot forum.  No music yet, and not narrative either as I'm slowly learning Shotcut and creating these kinds of videos to grow my channel as my hobby video channel!


Finished product here for all to see!


Wednesday, November 6, 2019

Orks, bugs, and my painting evolution

Years ago I never blended colors together, or if I did, it was rather limited.  I painted with whatever was in the pot, and attempted to use another similar color in the pot if I did attempt to mix paint.  I never forced perspective, and did not give two hoots about what I read in Shep Paine's great tome of wisdom about building dioramas.  Arrogance of youth you might say.

Fast forward to when I took a 2D Design course as my Humanities Elective at my local community college (after all, if I need the credit, might as well have some fun...).  We took the primary colors in acrylic, and mixed them to get our color range.  We did limited palletes where we merely painted in a single color or de-saturated palletes, and all the wonderful other color concepts (to include black and white).  It only took a few years before I started exploiting this knowledge for my game miniatures.  You've seen the results before (in previous posts).  

Well, here are some pictures needing shared here on Sudsy's Tactics of the results of these experiments.  My memory is a bit foggy as to the exact pallete, but it involves the Delta Ceramcoat paint I've raved about before.  Well, my photography got better as well...  For the most part.


This is my Ork Nob for either Warhammer 40,000 or Gorkamorka.  This was a more recent use of both a wet pallete and more advanced forms of blending and forced perspective (thanks Shep Paine, I finally figured out what you meant, even if I don't have the full stop sign yet...).  However, this was not the first project...


My hive tyrant was my first us of what I learned in that 2D design course.  In fact, I used the same paint from that course thinned down considerably (after all, it was Liquitex Basics tubes...).  I loved the result, and I know it is NOT a completed model (yet).  I hesitate to complete it lest I ruin it...


This Carnifex is how I started out.  I cringe to think about how I left 1:1 scale lighting to do the work on a 28mm figure.  Sure, it works alright for a large bug like this...  But only 'alright' to 'sorta'.  Guess I can say that 2D design course was worth more than the Humanities Credit I took it for in the first place!

Saturday, September 8, 2018

T-55 AMV in 15mm Udate! 08SEP18

So, a while back I mentioned picking up platoon of Battlefront Miniatures Arab/Israeli Wars "Fate of a Nation" T-54/55 tanks for us on the Arab side of that conflict in 15mm game form.

Well, I have an update!


You can see I printed out Takom/Mig's free paint guide, and I scaled a photocopy of George Bradford's "AFV Plans: Cold War Armored Fighting Vehicles" from Stackpole Books.  In this case, it was the older T-55AM update to the venerable system (skirt armor, additional turret armor, electronics) which was the update closet to what I was looking at.  At any rate, the scale drawing gave me a great template from which to measure.


For the skirt armor I used .042" sheet styrene (Evergreen).  I approximately scored the the seams where the skirt plates are separate with carbide tipped scribing tool (mostly used for machining where you layout your metal parts, but re-purposed for the hobby bench like most other hobby tools).  These sat around for a couple years with the rest of the kit.  Finally, a couple weeks ago they got pulled out and super glued to the resin body assembly of the Battlefront kit.  After these parts dried, I pulled out good ol' green stuff two part epoxy and went to town sculpting the ERA (explosive reactive armor bricks).  While the green stuff was curing on the hull assembly, I worked on the turret ERA and laser designator/enhanced optics over the main gun.  I had done  the main gun a while back with the skirt armor.  It was by far one of the easiest tasks for this project.

I'm not entirely happy with my lack of detail.  But then, they are 15mm game miniatures.  There must be a bit of compromise between detail and ability to pick it up and move it around on the tabletop battlefield.  That, and I just wasn't up to the task with my life in its current state of perpetual busyness.  I wouldn't compromise the parenting part of that for the world.  After all, my older sons follow along to the game shop and play games, that or pester me at home!  So, I'm 1/3rd complete on the conversion side!  Sure, it takes me more time to do so these days, but that is fine.  The point is to keep doing it because I love it.  It's a hobby, not a job.

Thursday, July 9, 2015

09JUN15 15mm Strykers

Before getting my BMP's from Khurasan, I received my QRF Strykers from the American dealer, Scale Creep Miniatures.


 Wasn't it nice of them to send me a couple of suckers?!  As you can see, I ordered three Stryker IFV, Infantry Fighting Vehicles (or is it Variants?).  These are your 'vanilla' Stryker variants, and the basis for all other variants.  There are lots.  But only the IFV's in 15mm for now that I have found.  At least for the moment.  Though in 10mm, I've seen the others, such as the Mortar Carriers, Engineering, Scouting, and others.  Common 15mm makers, catch up!  Lets just say, they are on my bucket list...  I'm a proud Styker Brigade Combat Veteran after all.

I'm pretty happy with the level of detail QRF put into these Strykers.  All hatches are modeled closed, and the bodies are pretty solid (they are 'hollow' in that on the underside they are open to save material and reduce weight).  This is not a limitation for me, as the rigors of the wargaming table would result in damage to any open hatches in this scale!  They certainly were made to be handled on the table.  Being pewter, once assembled, they commend the weight and respect traditional pewter gaming miniatures just feel they have.  It almost makes you want to use lead fishing weights on those plastic kits...

I cannot say the quality of casting was perfect.  There was quite a bit of cleanup required.  Just look at that Ma Deuce (Browning M2A3 machine gun) on the RWS (Remote Weapon System).  This barrel is shorter than spec, and tappers horribly.  I'm going to have to either live with it or cut it off and finagle a new barrel out of a needle or pin.  The racks along the rear of the hull (they aren't the standoff slat armor, and if they aren't racks, they got used that way anyway) required some pulling into shape.  The cooling of the pewter resulted in these being slightly warped.  Really, that was a minor nuisance.  One expect that from pewter, and even resin.  Some of the mold lines required some filing.  Based on the single piece cast in pewter, it was to be expected.  I didn't need any filler, again, a result of a single piece casting.  Small scale has its advantages.

OUCH, barrel melted...


Tires required a bit of cleanup on the bottom.  Not a big deal again considering they are cast from pewter.  These shapes don't always lend themselves to good mold lines.  I had to test fit and file a few to get them pretty level.  These miniatures almost don't need a base, but for uniformity they are likely going to all get glued to a 2.00 x 3.00 inch base (metric people, 25.4mm = 1.00 inches).  

Once cleanup was complete, assembly proceeded without any hitches other than assembler error with gluing the RWS onto the top of the first Stryker before priming and painting.  Don't do that.  You need to leave the RWS off so that you can rest the model on its top to prime and paint it fully.  

What the RWS and Ma Deuce should look like...

While there are some quirks to QRF's product, it is indeed solid and serviceable for the wargame table.  In fact, I'd say I'm very happy with the level of detail they put into these models and I won't hesitate to buy more when the time comes to expand my vehicle collection.  I just hope they make some more of the other variants.


Wednesday, July 8, 2015

07JUL2015 "BIMP" spotted...


Soviet designed, and very first, Mechanized Infantry Fighting Vehicle (MICV) BMP-1 that is.  This one is a Khurasan Miniatures  15mm/1:100 scale version.  I ordered these back in May, and they were worth the wait.  Khurasan is a small miniature company based out of New York (the state, not  the city).  While small in corporate footprint, their work is nothing less than spectacular in the world of 15mm wargaming on this side of the pond (as the majority of the hobby is produced in merry ol' England).

Being a fan of Osprey's publication of Ambush Alley Games "Force on Force" and "Tomorrows War" I jumped at the chance to spend my tax return money (thankfully I got one this year...) on a good force.  Having spent some time in service in the USAF TACP training to hunt Soviet trained and equipped forces (no matter how long the Cold War ended, American and Soviet methods and equipment are still the two most proliferated in the world, even with local modifications and upgrades), I decided to dig up some TO&E from an old manual (FM-100-2-3) and make a Mechanized Rifle Regiment (MRR) rifle company.  Another good reference is the suggested force list in the back of "Force on Force".  I like the FM reference a bit more, with some added information from sources that have come forward since the end of the Cold War.  I've read about extra machine gunners attached to platoons, and in the Warsaw Pact Forward Area MRRs facing NATO, a couple of extra BMPs at the company level carrying laser/optic jamming gear.   Such variations are to be expected, as any good military organization can be that flexible.
Good cast parts on the BMP, with some 15mm QRF Strykers
in the background...

I ordered three BMP-1s from Khurasan along with their Motorized Rifle Platoon set of miniatures.  I look forward to getting the miniatures done next.  Today I'm going to discuss my building of the first BMP.  Upon opening the plastic bag and pouring out the parts, I must say I'm very impressed by the quality of the resin casting from this small company.  Very little cleanup was needed compared to other resin parts I've worked with from bigger manufacturers.  Just some slight mold lines here and there to tidy up, and the mold sprue lines were sized just right to make them easy to remove with just a No. 11 hobby blade and not have to grind with a rotary tool.  Mold lines were so well chosen on all the parts, including the pewter, that I hardly spent any time scraping or filing.  I did have to clean a bit of the sprue from the rear of the vehicle to make room for the doors.  If you look closely enough, you will see that Khurasan made the master with a very good 3D print.  This does not effect the detail in any way, as being familiar with armored vehicles, slight imperfections are only going to add to the realism when they are painted.

A close inspection of the deck shows the 3D printed pattern of the master, dwarfed by many fine details
including the drivers periscopes and screws holding the vents and other panels in place.

Only a little cleanup needed here.

Assembly was pretty easy.  I did have to reference some photos of BMPs to ensure I got the right door in the right spot.  I thought about making the doors open and getting some crew figures, but the rigors of handling during a game would make that a bit labor intensive on the constant repair side.  Last thing I want to do in a game is fix a miniature or lose a part.  I am only worried about the the AT-3 on the turret over the barrel.  In 15mm, these are TINY and don't have a lot of surface area for glue to form a bead and hold it in place.  Caution will need to be exercised when handling this piece!  Keep the super glue solvent handy along with tweezers, this is a part you will likely glue to Mr. Hand during assembly.  For once, luck was with me and I did not glue myself to the project leaving 1:1 scale finger prints.

Assembly went well with the tracks fitting the body of the BMP with a tighter tolerance than some more expensive plastic kits I've built in the past.  The only gaps were the along seams that exist on the real vehicle.  No filler putty was required.  Each of the road wheels could be glued into place along the bottom of the body, however I like the way the tracks were flexed slightly on the bottom.  This can add to the model when based on the appropriate terrain, as few armored vehicles I've ever seen have perfectly level tracks in contact with the earth.

Pewter parts attached to resin with good points of contact along hatch edges and hinge points.  Troop commanders door was a bit rough though, being a half moon shape, it fell into the hatch a few times.  Good candidate for gluing open for those who choose to do so.

I look forward to priming and painting this kit.  Khurasan Miniatures are well worth every penny and any wait to receive.

BMP-1 from Khurasan completed

BMP-1 from Khurasan, rear troop doors.


Friday, February 7, 2014

07FEB14 Miniature time!

I don't even want to look at my past posts to see how poorly I've updated this blog.  So, without further delay, here is what I've been up to lately:

28mm scale model of the Heuvelman IA25M used by Hammer's Slammers in David Drake's series, reference from Mongoose Traveller's Hammer's Slammers supplement.

The Miniature collection (with other odds and ends).  Large figures are 1/6th scale, small ones are 28mm or so from Rackham and Games Workshop.

My 1/12th scale reference drawings for a future sculpt of a Warhammer 40K (Games Workshop) Tau Fire Warrior

Some Reaper CAV Saber AFV's that I finished up and integrated into my slowly growing 6mm scale Dirtside 2 force.

Paints I used.  With enough Windex you'd be amazed at how nice you can get that Liquitex Basics to become very fluid.

A Unioc from Howard Tayler's masterpiece web comic "Schlock Mercenary"  My FIRST 28mm figure to reach COMPLETION.

Google's little animation of a series of photos I took of the Unioc during the painting process.

Unioc work in progress with inspirational and scale reference minis

Sideview of the Unioc in green.


How far I got the first day.  

So, while its been slow in anything but the computer gaming sector, I've been no complete slacker with my table top games.  I'm pretty proud of my first complete 28mm figure!  Even if its not human....  You'll notice, if you've followed me since 2007 when I first blogged, I only really finish alien figures.  Don't ask me why, but my aliens always seem to come out better.  I might also just be too critical of my human faces at this point.

Wednesday, December 11, 2013

11DEC13 Where is Sudsy?!

Well, I just wanted to let my followers know I haven't fallen off the face of the earth (yet, though I keep trying to convince my wife we need to take the kids and exit the earth gravity well and live on the Moon or Mars...).

Obviously, not much time for games and the like.  I took to continuing my education and am currently in the Winter Quarter of my first year in obtaining my Associates Degree in Applied Science.  I'm going into Precision Machine and am going nail down a job as a machinist.  Considering the way 3D printing is going...  That is going to be where I'm going to try to grow.  I already see 3D printing in the gaming world alongside sculpting and resin casting!

Speaking of sculpting, I've become addicted to Howard Tayler's Schlock Mercenary web comic.  Here is a fan sculpture and learning sculpture of a 28mm version of on of his characters, a Unioc named Lt. "Ebby".  If you read the strip, you'll know who...  If not, well I'm not telling you much beyond that to get you as hooked as myself!

 Nearly finished green
 Phase 2
Phase 1

Wednesday, February 1, 2012

Legion of Myth Game Reviews...

The Guild Legion of Myth has a fairly new format for reviewing tabletop, board, and pen and paper RPG's...

So far I've written several reviews, beginning with my favorite board game, Ogre/GEV.

I'm fortunate that it doesn't matter when the game was published, and in fact most of what we all seem to enjoy is currently out of print at the present time!  Its a wonderful community over there as they embrace all forms of games with a focus on PC MMORPG's with Star Wars: The Old Republic being the current active guild.  At the moment due to computer limitations, I'm now focusing all my efforts in the realm of either older computer games or table top gaming.  Can't say its a bad thing.

Other game games that I've reviewed to date are:

Don Quixote (board)

Stars Without Number (RPG)

GURPS Traveller: Interstellar Wars (GURPS 4E RPG Sourcebook)

I have several other RPG rules sets and sourcebooks I'll knock out this year as well.  I have the Mongoose Traveller RPG rules which I think I wrote about once before, and the "Hammers Slammers" Sourcebook!  I've also had the opportunity to get a couple play sessions of the WotC D20 Star Wars RPG (Revised Core Rules) with a friend recently.  That one might lead to some interesting cartoons...

Boardgame wise, I'm hoping to get a good meaningful play session of Conan in sometime.  We'll see if that happens...  I certainly don't want it to collect any more dust!


Saturday, August 28, 2010

28AUG10 Appendectomy, good for my quieter indoor habits, like gaming!

Koldfoot from &Games can attest the fact that summers up here are busy. So busy in fact that we all feel compelled to keep moving and not sit down for long. Well, with only about three, maybe four months tops, of good weather can you blame us? We've got to get the entire outdoors in beautiful weather knocked out! Which leads to my biggest gaming downtime of all... It all culminates in the Moose season (opens next month!) and then slows down a bit as we are forced inside by the elements more and more (even the trappers spend more time inside cabins along the trap lines!). Winter comes, and the board game, table top, and computer games (due to lack of opponents during the exact hours of my toddlers nap times...) come to the forefront more.

However, this summer, I got hit hard and have to stay inside more. At the moment, I'm recovering from an appendectomy. Last Sunday I started with a sore stomach that led into going to the Emergency Room and then under the knife to have it removed. BAM! There goes a week of high intensity outdoor time! Not to worry, it game me some endless hours of reading contemplation (when I wasn't acting as conflict management for toddlers...) for several game related activities!

First, I'll publish the game table pictures. BEFORE I got sick, I was actually actively working on a game table for my miniatures. Then I'll publish some miniature stuff for 10mm/N-Scale vehicles from some kits my wife and I found in Omaha NE at a model train store. Finally, I'll get some pictures of some nice print and play free sample modules from Amarillo Design Bureau who took over the license for Star Fleet Battles after Task Force Games went under!

I'll get this blog updated! Hopefully I'll get some games action in this fall and winter!

Tuesday, July 20, 2010

20JUL10 The RPG Tank...


Be very careful what you tell players, in fact, you might want to clarify depending on genre... After all, with a game system like GURPS (Generic Universal Role Playing System by Steve Jackson Games, www.sjgames.com) you certainly have to. After all, you never know what sourcebook a player might have picked up and what kind of character they slipped into your game world! Yes, I'm such a Munchkin...

Most references to various games are Copyright Steve Jackson Games. "Bolo" is reference to the giant cyber tanks which are the brain child of Keith Laumer (and an inspiration to S.J. and crew) along with "Gottlos" being the cyborg tank idea of Colin Kapp (Analog Collected works Number 8, picked up at a library book sale years ago!). Fans of "Ogre/GEV" will instantly recognize the references to the orignal ideas that inspired Ogre.

What can I say, I find the idea of giant self aware tanks that pack enough firepower to match an armored company pretty fun as a science fiction game concept. My roleplaying game experience is pretty limited, so when I first heard 'tank' in reference to Fantasy RPG's you can imagine the devious thoughts that went through my head. As I've been a GURPS book reader and Ogre player since the age of 12... The fact that I have some friends who might play a GURPS Fantasy module and I have GURPS Ogre on my shelf...

Friday, February 27, 2009

27FEB09 First Map


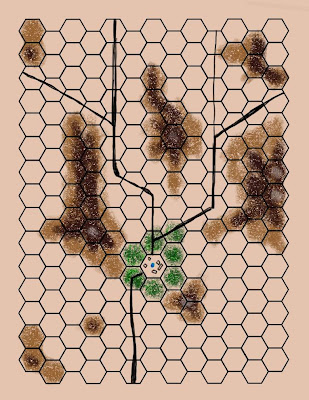
I did it! I finally combined Inkscape (to do the hex grid) with GIMP (to turn the .png exported from Inkscape into a multi-layer Photoshop Document .psd file) so I could use Painter X to paint the background! So, you have a small village with the well and a battle field with several choke points to fight over. So far, no numbers yet...

Nuts and Bolts (short version):

1. Using Inkscape, I made a .65 inch high hexagon with .03 inch width stroke for line weight. I also made sure my document preferences were for US Letter size paper... Important! Inkscape defaults to A4, most of its development is done in Europe! When I was happy with where my hex grid was, and its alignment, I exported the entire page to .png format which allows RASTR editors like Photoshop or the GIMP to read it as a picture instead of a scalable vector graphics (.svg) file.

2. Using the GIMP (or Photoshop if you are rich enough, I know you aren't a pirate, if you are you need to try the GIMP... I've used the CS Demo and I'm not impressed with Photoshop...) I loaded the .png file. It starts out as black lines on a transparent sheet! Thats fantastic! Thats what makes it handy! I added another layer that was opaque white and moved it behind the hex grid. If I wanted to, I could start making my maps now by working on layers underneath the hex grid! After getting the background in place, I saved the file as a Photoshop Document (.psd).

3. Finally, I loaded the .psd file into Painter X. Painter X put up a background layer called 'canvas' behind my white background, so I deleted the white background and proceeded to add layers and build my map. Finally, I saved a copy in the .RIFF format for further editing using Painter X and exported a copy as a .jpg which we see here!

There you go, baby steps! Turning terrible twos!

Tuesday, December 9, 2008

09DEC08 V 1.0 Legal Size 3/4" hex sheet


As promised, a legal paper size blank hex grid. Its a .png file, so its black on transparent, recommend edit in GIMP/Photoshop or similar (I've found that Painter X doesn't support .png files, no worry, I'll just use the GIMP and convert it to a .psd file!).

I've also found Scribbus, which is the CYMK workaround to get a GIMP drawing to print (GIMP only does RGB color which doesn't work well for print, while Scribbus is an open source publication tool which is made to convert RGB to CYMK!). I'll see if I can post more later, once I figure out how to do things with it myself!

Right now, my hex sheets are FAR from perfect. My alignments are off, I have no grid numbers (but with a couple variations on how to number, thats no surprise...), and I'm not sure they are within printing boundaries! I've also got to come up with standard convention for naming so that when I have variations, its easy to identify and figure out which ones you want. On top of that, I've got to find out where I can put the native .svg (scalable vector graphics, Inkscapes native format) so that everybody can download and edit as they see fit (i.e. make your own grid numbers to correspond to whatever board you want or are expanding!). Right now, Deviant Art is the only site I can think of, but I'm not sure yet.

Recommendations welcome!