Wednesday, November 28, 2018

T-55AMVs in 15mm Complete!


It only took a couple years from purchasing the base kit, through starting to cut my first pieces of styrene for the skirt armor and adding the first reactive armor bricks in green stuff, to painting!

But I am pleased with the results.  Not high grade sculpting, not scale model quality, but great table top gaming quality (i.e. you can touch them, and drop them, without worrying too much about damaging them much).

Details are from the third tank I did.  When I got around to this one, I had the process of sculpting the armor down to a science (or near enough), and am most happy with the level of detail I achieved.  I almost exceeded my goal of conveying these were the upgraded T-55s through a minimum of detail...  Yeah, I really wish I felt I could have spent more time to do these better.  However, I did compensate for the lack of sharp sculpted detail with some paint highlights that force the perspective, and the results are more impressive than I was looking for!

Painting included the use of Krylon Camo tan for the primer, and then my usual assortment of Delta Ceramcoat acrylics (Dark Forest Green, Trail Tan, and then highlights), and Game Color (gun metal metalic).

This platoon is ready for action in the Fulda Gap with Team Yankee, or some third world brush war in the modern era with Force on Force!

Sunday, November 25, 2018

25NOV18 - Tossing Stones, the painting process

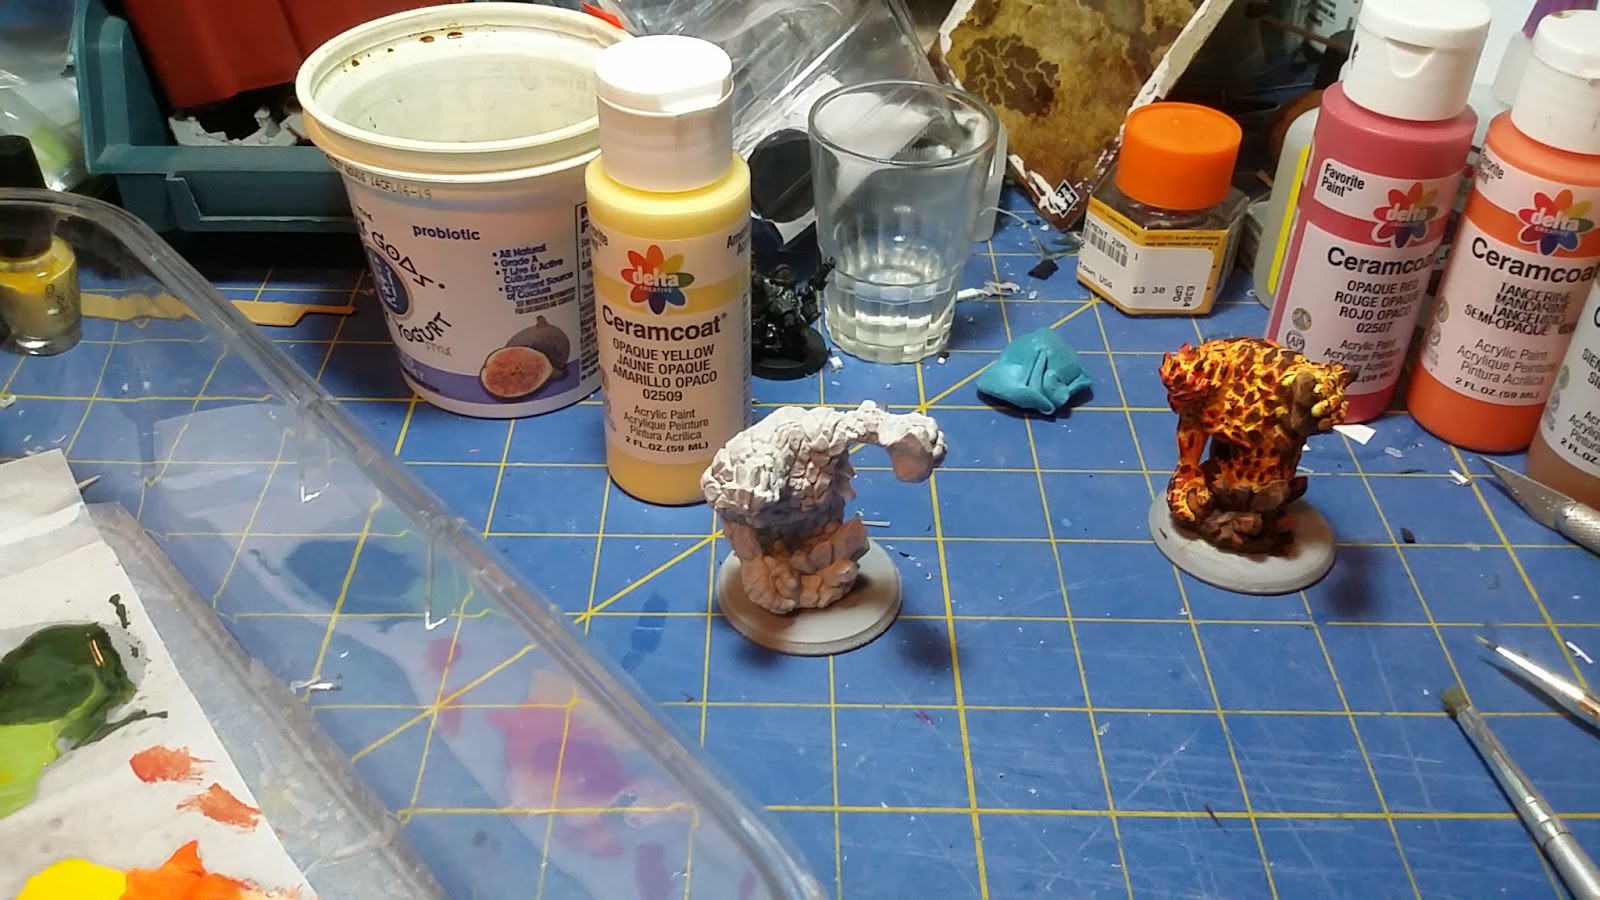
So, for starters, this is the Wizkids Pathfinder Deep Cuts Medium Earth Elemental (SKU 73357/UPC 63448273357-8 for those interested in acquiring exactly this pair of miniatures). The package comes with two of them, and costed about $5 USD. That would be about $2.50 a miniature, and both are very detailed, and frankly rival anything Games Workshop puts out without being charged through the nose. They are pre-primed as well. This is a two edged sword however, as you are going to spend some time removing mold lines, which on these guys is not too bad as they are pretty easy geometrically to scrape mold lines off of. On these guys, I did not find myself re-priming. The light primer surface really enhanced the way I was going to paint them. Wizkids chose to do a, to me, boring grey rock type elemental with green crystals on the clear elements attached to the torso. I wanted something different…

I wanted more of a molten, lava, living elemental coming strait through the crust from the core of the planet! Sure, it runs the risk of overlapping a fire elemental… But hey, the core of our planet is molten iron, why would an earth elemental not be of the same material? Makes sense to me. My palette for this project was simple. Delta Ceramcoat (higher quality US acrylic craft paint, does everything my Liquitex acrylics have done, without all the thinning…) Opaque Yelllow, Opaque Red, Tangerine, Raw Sienna, and Burnt Umber. So far, that Opaque Yellow is a great “go-to” for painting anything that is going to be yellow! Make sure to prime the surface in a light color (as these were already pre-primed, that was easy). Whenever I use a black or dark grey primer, I tend to use Ceramcoat Ivory on the desired surface, and that tends to do the trick.


I also got to play with my improvised wet palette, basically a food container, wet paper towel, and a piece of parchment paper!
Step 1: Using a flat brush (in this case, a #3 Bright), coat the elemental in Opaque Yellow, and ensure you get the paint into the cracks and crevices. This is the base coat for the elemental. Base coat the earth with Burnt Umber.

Step 2: Using the flat brush again, drybrush orange onto the surface of the elemental, don’t panic if you get some of the orange paint into the cracks and crevices of the elemental, we will use this chaos in our miniature to turn it into art, and we’ll also go back and get some of that later.

 
Step 3: Do Step 2, but with the Opaque Red

 
Step 4: Now we take our 15/0 or 20/0 round brushes, and use some more Opaque Yellow sparingly in the crevices to re-coat them with the much lighter paint. This will serve to add the glowing from the inside effect we will want when we get done.


Step 5: Now, the moment of truth for the lava effect! Grab the Burnt Umber, and using a combination of the flat and round brushes, pick up the high points on the elemental’s surface. After all, lava and molten iron cool away from the source of the heat, and it has the darker color effect. This is also when we take the Raw Sienna and highlight the areas on the rocks (using dry brushing), and maybe mix in a bit of the yellow and orange to add some glow to those edges remembering that the primary light source for those would be the figure of the elemental itself. I chose not to paint the crystals translucent, and just make them a part of the elemental. When I figure out those translucent spell effects, I’ll share…


 So, there you have it folks!  Economical limited palette anyone can try at home!  All said, I think the cost of the brushes years ago outstripped the cost of these two miniatures and paints combined...  Even then, not my much (the nice Reaper and Liquitex brushes anyway).  So, when I get to use these in a game, perhaps Dragon Rampant, someday you might see a battle report!

Friday, November 23, 2018

23NOV2018 Tossing stones!

Tossing stones with a Wizkids Deepcuts Medium Earth Elemental!


Saturday, September 8, 2018

T-55 AMV in 15mm Udate! 08SEP18

So, a while back I mentioned picking up platoon of Battlefront Miniatures Arab/Israeli Wars "Fate of a Nation" T-54/55 tanks for us on the Arab side of that conflict in 15mm game form.

Well, I have an update!


You can see I printed out Takom/Mig's free paint guide, and I scaled a photocopy of George Bradford's "AFV Plans: Cold War Armored Fighting Vehicles" from Stackpole Books.  In this case, it was the older T-55AM update to the venerable system (skirt armor, additional turret armor, electronics) which was the update closet to what I was looking at.  At any rate, the scale drawing gave me a great template from which to measure.


For the skirt armor I used .042" sheet styrene (Evergreen).  I approximately scored the the seams where the skirt plates are separate with carbide tipped scribing tool (mostly used for machining where you layout your metal parts, but re-purposed for the hobby bench like most other hobby tools).  These sat around for a couple years with the rest of the kit.  Finally, a couple weeks ago they got pulled out and super glued to the resin body assembly of the Battlefront kit.  After these parts dried, I pulled out good ol' green stuff two part epoxy and went to town sculpting the ERA (explosive reactive armor bricks).  While the green stuff was curing on the hull assembly, I worked on the turret ERA and laser designator/enhanced optics over the main gun.  I had done  the main gun a while back with the skirt armor.  It was by far one of the easiest tasks for this project.

I'm not entirely happy with my lack of detail.  But then, they are 15mm game miniatures.  There must be a bit of compromise between detail and ability to pick it up and move it around on the tabletop battlefield.  That, and I just wasn't up to the task with my life in its current state of perpetual busyness.  I wouldn't compromise the parenting part of that for the world.  After all, my older sons follow along to the game shop and play games, that or pester me at home!  So, I'm 1/3rd complete on the conversion side!  Sure, it takes me more time to do so these days, but that is fine.  The point is to keep doing it because I love it.  It's a hobby, not a job.

Wednesday, June 14, 2017

Red Forces now include insurgents!

One would perhaps think it odd that someone like myself would be painting 15mm miniatures of enemies he faced in Iraq about 10 years ago, mostly because those same enemies still occupy parts of Iraq under a different name (but from the same root organization)...  But somehow, I'm not bothered by that as much.  I figure that gives me a slight edge in knowing how to paint and play them using various rules systems and exploiting the advantages of being an insurgent as opposed to a uniformed force.  

That, and I can paint them how I want, and justify it by personal experience...

These are the awesome Khurasan Miniatures modern middle east line (http://khurasanminiatures.tripod.com/modern-middle-eastern.html), starting with AFGHAN-WEP-COM, which are the PK and RPG armed squad.  I figure they can form the basis of what I call the CAKTs, or Chechen Armor Kill Teams (for further reading, anything by Lester A. Grau is recommend: http://fmso.leavenworth.army.mil/documents/rusav/rusav.htm & http://fmso.leavenworth.army.mil/documents/Rusn_leslrn.htm).  I plan on following the concept of teaming RPG/PK gunner teams across an urban landscape some day in the future on the war games tables.

What can I say, I'm a student of history, and that is the biggest draw of wargaming for me.  Simulate history, and see how you react.  

Here are more detailed miniatures in Central Asian (i.e. Afghan/Pakistani/Caucus region garb) from Khurasan Modern Combat series (Item MOD-2) containing a terror cell leader hiding in the mountains (BinLaden style) and a stereotypical hostage (screaming objective marker, because capturing hostages feels better than smashing a terror cell just for a laptop the might contain real world intel worth seizing more a stupid journalist who sympathized with sociopathic murdering 13th century religious fanatics just to get a scoop for the Times...).  Sorry, can't help with the commentary sometimes...

As we have come to expect, Khurasan hires great sculptors and casting companies, and my photography attempts and poor paint job do no real justice the incredible detail of the miniatures.

I unified my red force irregulars with khaki trousers (you know, the old school Soviet Motorized Rifle Regiment type from the 70's/80's that were left lying around...) and either desert style or woodland style camo jackets (again, more eastern European style camo, left lying around after a withdraw from the region in the late 80's/early 90's).  So, early war stuff.  Digital camo is hard to capture in 15mm.  But even the dots of paint can be construed as that at this scale!


Saturday, January 7, 2017

2017 Welcomed in the Dungeon, SEAL Direct Action Team with JTAC painted

New Years was spent playing the WotC boardgame Dungeon (the 2012 version anyway) with the boys.  Instead of playing with the cardboard pieces WotC uses, I pulled in some of my Khurasan Miniatures Tom Meier Collection Fantasy Master Pack 15mm Miniatures.  Not only are they top notch sculpts, with penny bases, they worked out great on the Dungeon board as well as adding excitement for a 6, 8, and 10 year old boy.

15mm Tom Meier Sculpts from Khurasan Miniatures taking on WotC's 2012 Dungeon
To match the cardboard pieces, I've painted the penny bases with the colors of each class based on the color of the cardboard counters.  Red for Wizard, Green for Rogue, Purple for Fighter, and Blue for Cleric.

I also finally finished my SEAL (or other SOCOM) 8 member team.  I decided to keep it simple and do desert colors.  This reflects the use of camo by the Dept. of Navy, be they SEALS or MARSOC, or even Army and Air Force from tri-color DCU days.  At any rate, this eight member team includes one sniper with M-14, an M-249 SAW gunner, a JTAC with radios (and whatever might be flying in a few hundred mile radius that can drop something...) and 5 members with M-4 carbines.  Given rules for most games (for example, Osprey/Ambush Alley Force on Force), even those 8 members, properly utilized, are a force to be reckoned with!


I was very pleased with the acrylic ink wash I used instead of wood stain this go around.  For one thing, drying time is minutes, not hours!  Once again, on both sets of miniatures, I mixed used, dried, coffee grounds into the burnt umber paint for the bases.  Perfect 15mm ground texture for a rocky arid environment!  I'll have to find the link of the guy who got me into doing that... 


Friday, December 9, 2016

Wow, I haven't worked on this since 2009?!

I just picked up an interior detail kit from Black Dog studios out of the Czech Republic for the M1126 ICV kit from AFV Club for my AFV Club 1:35th Scale TACP Stryker

Obviously, some modification is necessary (if you look at the 2005 Air Force news article I linked in that earlier post) to make it work for a CV/TACP variant, but it is manageable.   Besides, there are so many ways to fix things that might not fit just right...  We had so much crap in those vehicles, it wasn't funny...  Such is mechanized warfare, why pack light when you stick ammo cans full of ammo in every crevice not filled with MRE's, AT-4 rockets, a set of cots, or someones assault pack?!

Speaking of MREs, I think Black Dog Studios is the first aftermarket kit, or mass produced kit for that matter, with a modern US forces in Iraq or Afghanistan NOT to have a set of MRE's in the kit...  Amazing! I never realized there were so many MREs just laying about...


The Workbench, picking up where I left off 7 years ago.
Test fitting the Drivers Compartment with poster putty (blue tac)